

Table of contents
- Build a Website on Google Cloud: Challenge Lab
- Task 1: Download the monolith code and build your container
- Task 2: Create a kubernetes cluster and deploy the application
- Task 3: Create a containerized version of your Microservices
- Task 4: Deploy the new microservices
- Task 5: Configure the Frontend microservice
- Task 6: Create a containerized version of the Frontend microservice
- Task 7: Deploy the Frontend microservice
- Congratulations
Build a Website on Google Cloud: Challenge Lab
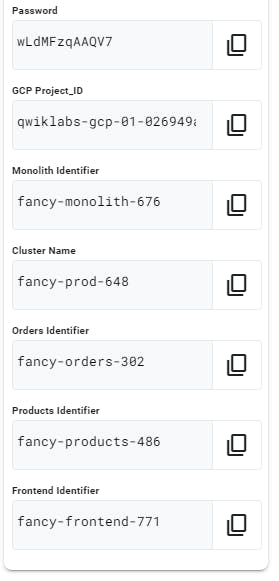
These are the Identifiers provided to you might be different for you so make sure to replace them accordingly where it is being mentioned.
Task 1: Download the monolith code and build your container
Open Cloud Shell and run
- Clone the repo
git clone https://github.com/googlecodelabs/monolith-to-microservices.git
- Run the setup.sh
cd ~/monolith-to-microservices
./setup.sh
cd ~/monolith-to-microservices/monolith
npm start
- Open web preview on port 8080 and check the build after completing
- Again paste this in cloud shell
gcloud services enable cloudbuild.googleapis.com
- Make sure to replace your with your [monolith identifier] provided
gcloud builds submit --tag gcr.io/${GOOGLE_CLOUD_PROJECT}/[monolith identifier]:1.0.0 .
Task 2: Create a kubernetes cluster and deploy the application
- Make sure to replace your with your [cluster name] provided
gcloud config set compute/zone us-central1-a
gcloud services enable container.googleapis.com
gcloud container clusters create [Cluster name provided to you] --num-nodes 3
Make sure to replace your with your [Cluster name] provided
kubectl create deployment  [Cluster name] --image=gcr.io/${GOOGLE_CLOUD_PROJECT}/ [Cluster name]:1.0.0
kubectl expose deployment  [Cluster name] --type=LoadBalancer --port 80 --target-port 8080
use this command to check the build
kubectl get all
Task 3: Create a containerized version of your Microservices
- Make sure to replace with your [Orders Identifier]
cd ~/monolith-to-microservices/microservices/src/orders
gcloud builds submit --tag gcr.io/${GOOGLE_CLOUD_PROJECT}/[Orders Identifier]:1.0.0 .
- Make sure to replace with your [Products Identifier]
cd ~/monolith-to-microservices/microservices/src/products
gcloud builds submit --tag gcr.io/${GOOGLE_CLOUD_PROJECT}/[Products Identifier]:1.0.0 .
Task 4: Deploy the new microservices
- Make sure to replace with your [Orders Identifier]
kubectl create deployment [Orders Identifier] --image=gcr.io/${GOOGLE_CLOUD_PROJECT}/[Orders Identifier]:1.0.0
kubectl expose deployment [Orders Identifier] --type=LoadBalancer --port 80 --target-port 8081
Make sure to replace with your [Products Identifier]
kubectl create deployment [Products Identifier] --image=gcr.io/${GOOGLE_CLOUD_PROJECT}/[Products Identifier]:1.0.0
kubectl expose deployment [Products Identifier] --type=LoadBalancer --port 80 --target-port 8082
wait until the build completes
kubectl get all
Task 5: Configure the Frontend microservice
- Run in cloud shell and open nano editor
cd ~/monolith-to-microservices/react-app
nano .env
- Replace these with you external ips
REACT_APP_ORDERS_URL=http://<ORDERS_IP_ADDRESS>/api/orders
REACT_APP_PRODUCTS_URL=http://<PRODUCTS_IP_ADDRESS>/api/products
- use this commands to get external ips again
kubect get all

- Replace with the external ips and press CTRL + X and then Y to SAVE
npm run build
Task 6: Create a containerized version of the Frontend microservice
- make sure to replace with your [Frontend Identifier]
cd ~/monolith-to-microservices/microservices/src/frontend
gcloud builds submit --tag gcr.io/${GOOGLE_CLOUD_PROJECT}/[Frontend Identifier]:1.0.0 .
Task 7: Deploy the Frontend microservice
- make sure to replace with your [Frontend Identifier]
kubectl create deployment [Frontend Identifier] --image=gcr.io/${GOOGLE_CLOUD_PROJECT}/[Frontend Identifier]:1.0.0

kubectl expose deployment [Frontend Identifier] --type=LoadBalancer --port 80 --target-port 8080
Congratulations
You earned a new Skill Badge